|
Software needed for the DVD2(S)VCD
conversion:
[DVDx
Converter]
Although all my
own backups of DVDs are done
in MPEG4v3 format I did
some testing with some software
for VCD encoding and I came
to a very easy solution. You
no longer need an additional
tool like VCDcutter to
cut your MPEG1-stream
into two parts all this stuff
is done by one tool. And here's
how you're gonna do it:
- Download
the DVDx Package unzip
it
(only the internal codec
is included in this package
but this tools can also use
Adobe compatible plugins like
Ligos or Panasonic
MPEG encoders)
- Before you can encode your
movie you should have decrypted
and copied it to your harddisk.
Refer to CSS Decryption on
how to do it.
- Fire up DVDx by running
DVDx.exe
(the tool might ask where
you have your DVD-root for
direct encoding of DVDs but
we're using the Open IFO..
function so just answer truthfully)
The main window should look
like this (in this case
there's already a movie loaded
but the GUI looks the same
on first start just without
the picture in the middle):

- Now choose File->Open
IFO
- Navigate to where you copied
the DVD
- Choose the *.IFO
File that SmartRipper copied
- Select the OPEN button
- Now the Input setting
dialogue appears
(here you can choose audio
streams, subtitles etc...)

- Choose the right title in
Program Chain under
Index
(commonly movies only have
one title and one
angle, but there are also
movies that break this law
like The Matrix)
- Choose the appropriate language
in Audio at Track
- For better audio quality
you should also check High
Quality (slow) for the
48KHz to 44.1 KHz conversion
(for most of my movies
I set Volume to 5 since
DVD's are mostly recorded
relatively low on volume)
- In case you want to have
subtitles in you VCD just
choose the language in Subtitle
(unlike DVDs, VCDs can
only have one subtitle since
the subtitle is part of the
encoded pictures)
- The rest should be detected,
but you might check the Framerate
which you should set to the
following:
PAL Movies : 25 fps
NTSC Movies : 23.976 fps
- Check the checkbox at Shutdown
the computer when job is done
if your encoding job is running
by night.
- Hit the OK button
to accept the settings.
- Now let's make the Output
Format settings
- Choose Settings->Output
Settings
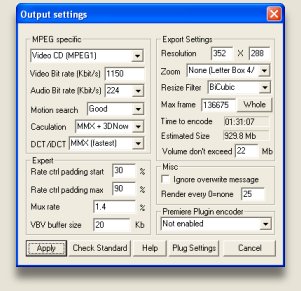
- First choose your target
format in MPEG specific
Video CD (MPEG1) for
VCD target (74 min movie
on one 650 MB CD)
Super Video CD (MPEG2)
for SVCD target (20min
movie on one 650 MB CD)
- Video and Audio Bit rates
are set to standard values
and should not be changed
- In Motion Search
choose Good for better
visual quality
- In Calculation choose
whatever meets your PC
(AMD Athlon users have
to set MMX + 3DNow
manually, the program does
not detect the processor type)
- Choose whatever DCT
suits your needs
- Now we choose the visual
resizing quality in Export
Settings
- Again Resolution
should be left at default
since this is ISO standard
value
- Choose Zoom to whatever
meets your needs
(you can always check the
setting in the main window.
Whenever you change Zoom and
some other values the picture
in the main window changes
without hitting APPLY)
- Resize Filter should
be set to BiCubic for
best quality
- Max Frame can be
used to make some tests. For
a whole movie click Whole
- In Estimated Size
you see the approximate length
of the MPEG File. If the file
exceeds one CD you should
put half the value
in the Volume don't exceed
field
- Leave Expert and
Misc settings as they
are.
- NOTE FOR ADOBE PLUGIN
USERS:
You can also use Adobe Premiere
Plugins with the field Premiere
Plugin encoder. Just choose
the decoder of your choice
and configure it via the Plug
Settings button.
- Hit APPLY to accept
the settings.
- Now we are back in the main
window
- Click the Select Output
button and browse to where
you MPEG File should be stored
and give it a good name
(the name of the movie
would be a good idea)
- Check the settings you see
at Input and Output
- If all is OK just hit Encode
and let some time pass
- SHORT BURNING GUIDE:
(utilizing Nero Burning
Rom)
1) Start up Nero Burning
Rom
2) Choose VideoCD or
SuperVideoCD (depending
on your conversion)
3) Click New
4) Drag'n'drop the first file
to Video1 Window where
Track is standing
5) Open the Write CD Dialog
6) Click Burn
7) Do the same procedure for
second, third or fourth CD
- Put the CDs in your DVD
player and enjoy the S(VCD
|


